

How To Make Background Map Hammer
Things you demand earlier you starting time
Before you lot start making custom textures for your maps, make sure y'all take the following tools (these are the tools I apply when making custom textures) to create custom textures. Although you wont need all of them, having them can make your life and dreams a lot more doable.
- VTFEdit [nemesis.thewavelength.net]
- GIMP (optional)[www.gimp.org]
- GCFScape (optional)[nemesis.thewavelength.net]
- SSbump Generator (optional)[sourceforge.internet]
VTFEdit will be used for viewing and editing the .vtf and .vmt files
Gimp will be used to easily modify .png files we make (although you can employ any paradigm editing program that you're comftorable with.)
GCFScape will be used to extract textures from source games so we tin modify them
SSbump Generator will assist u.s.a. generate Normal Maps, and also Acme maps.
One time you have all of these, you can proceed to the adjacent part of the guide.
Creating your first texture
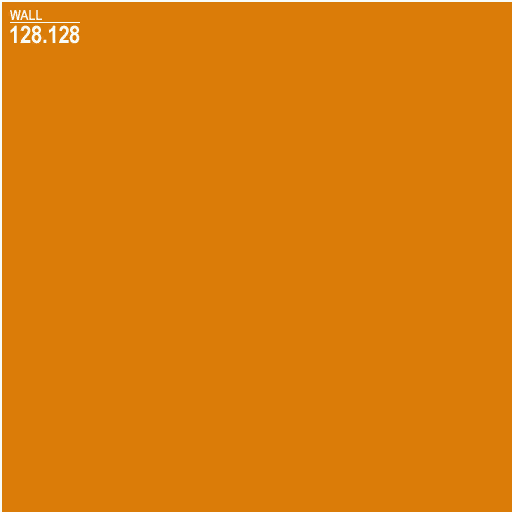
Say I wanted to make this total orange color into a texture

So to outset, I open up VTFEdit. Click "File", then click "Import". For me, I'grand going to become to where my orange color is located on my PC, and then double click it.
Brand sure your texture is a size that tin be divided by a power of two Sizes similar 512x512 and 256x128 images will work, simply 292x600 or something like 48x72 won't work.
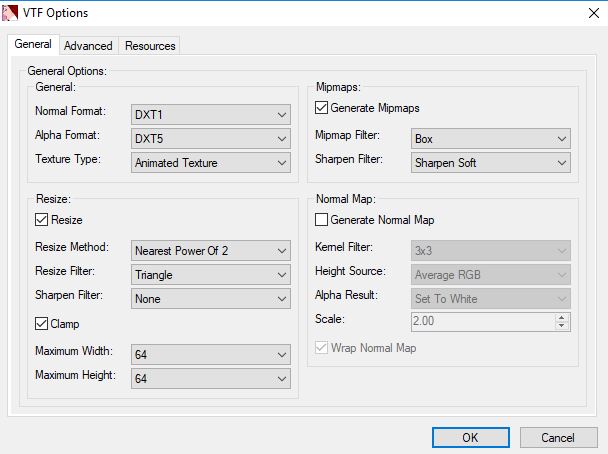

Since we aren't going to change our texture, we're just going to salvage information technology. Click "File", and then click "Relieve As". I'll proper noun my file "orangish", then click "Relieve".
We aren't done yet though, custom textures crave a .vtf (Valve Texture File) and a .vmt (Valve Material File). Click "Tools" so click "Create VMT". A carte du jour should pop upwards.
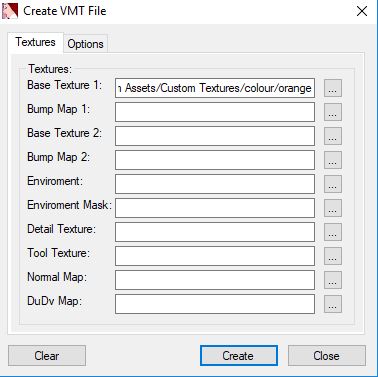
We won't alter much, but the one thing we do want to change is the "Base of operations Texture" parameter. We desire to remove everything before the file name, in this case, orangish. So our base texture should just be "orangish". Now click on "Options".
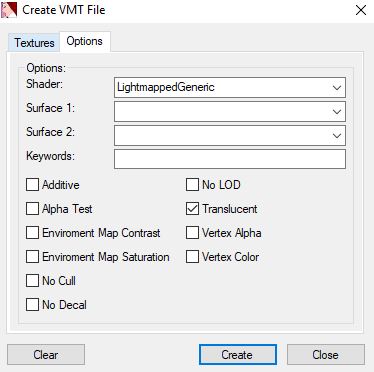
Hither we tin can change certain values. For my orange texture, we'll be checking off "Translucent" as our texture isn't translucent. We'll also exist changing our "Surface 1" parameter to "Concrete". And then click "Create". So at present nosotros should have both our .vmt and .vtf files.

To make sure our .vmt is going to work, double click it, and open it up in either VTFEdit or Notepad, or whatsoever other text editor.
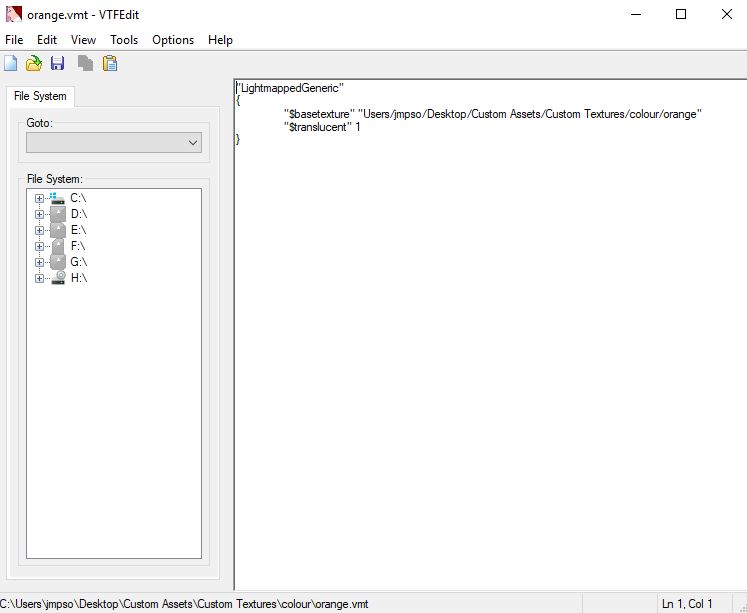
Since I put a spare version of my files in a different folder, and non the game folders, it gave me the directory from my "Users" all the style down to my "colour" folder. Since hammer volition base your texture origin file location off of the materials folder, we're going to get rid of everything except the "orangish" part of our $basetexture value.
Then now we want to drag both our .vmt and .vtf into our game'due south "materials" folder.
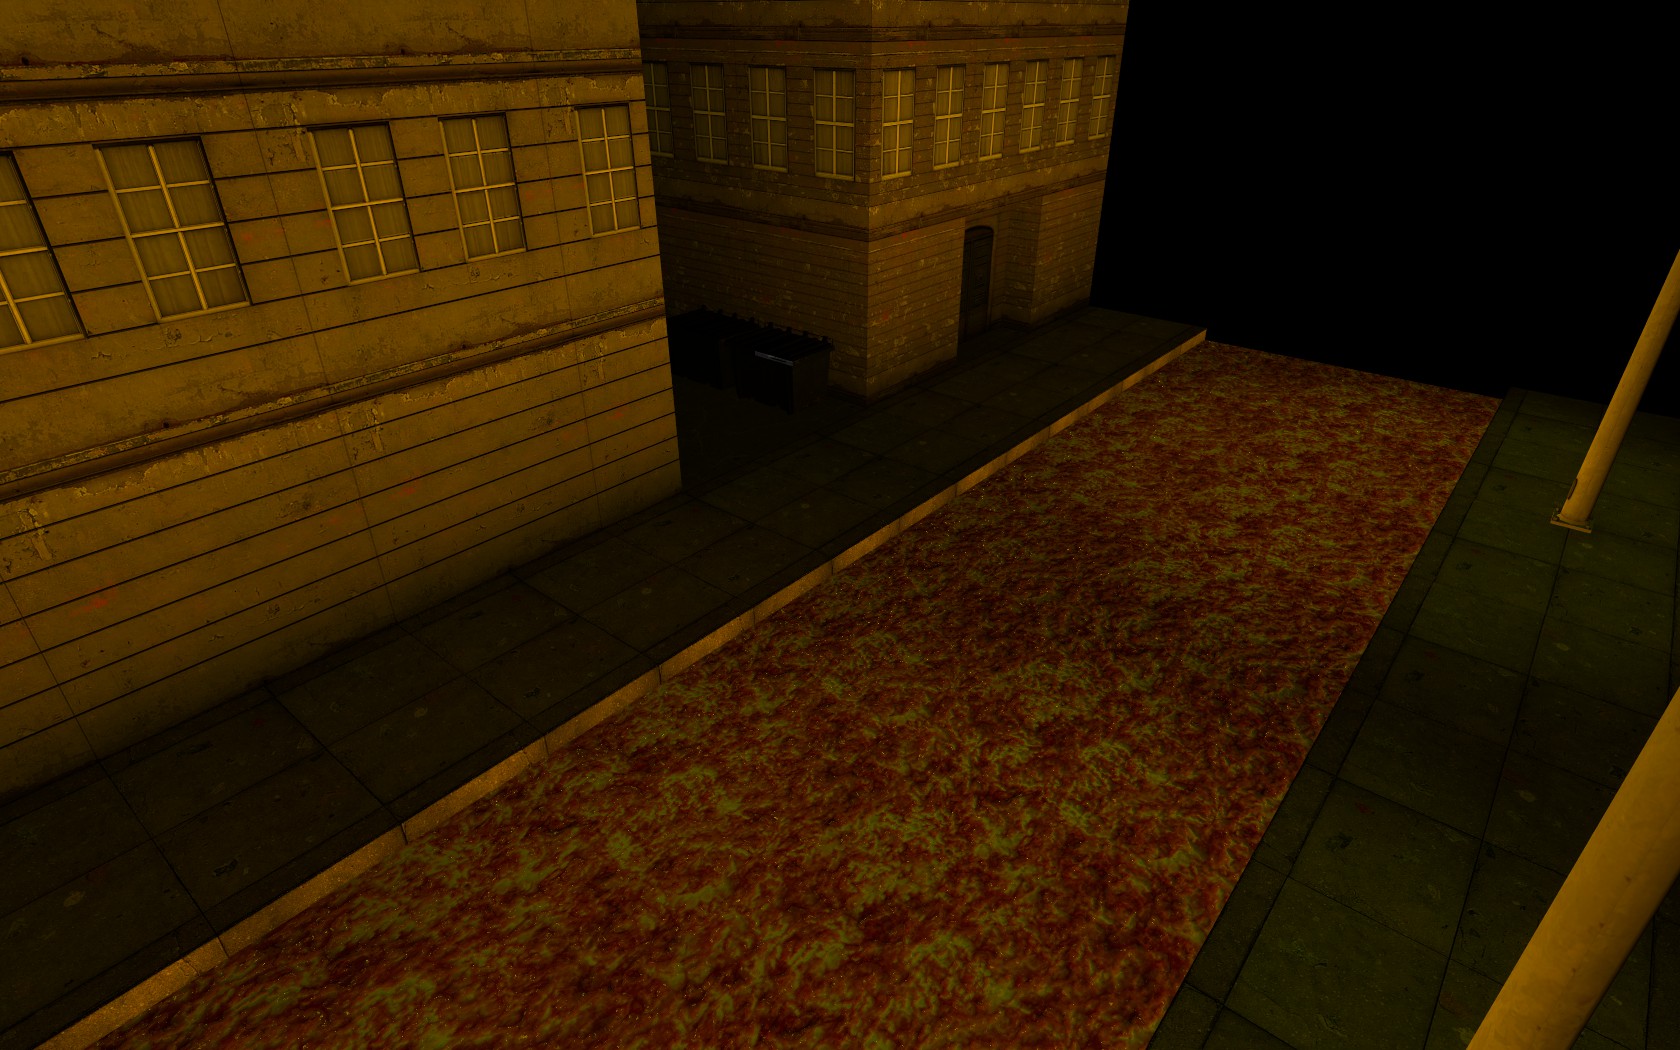
After all this, at present nosotros can go into hammer and create a map using our new texture. For me, +my custom orangish texture looked like this in game:
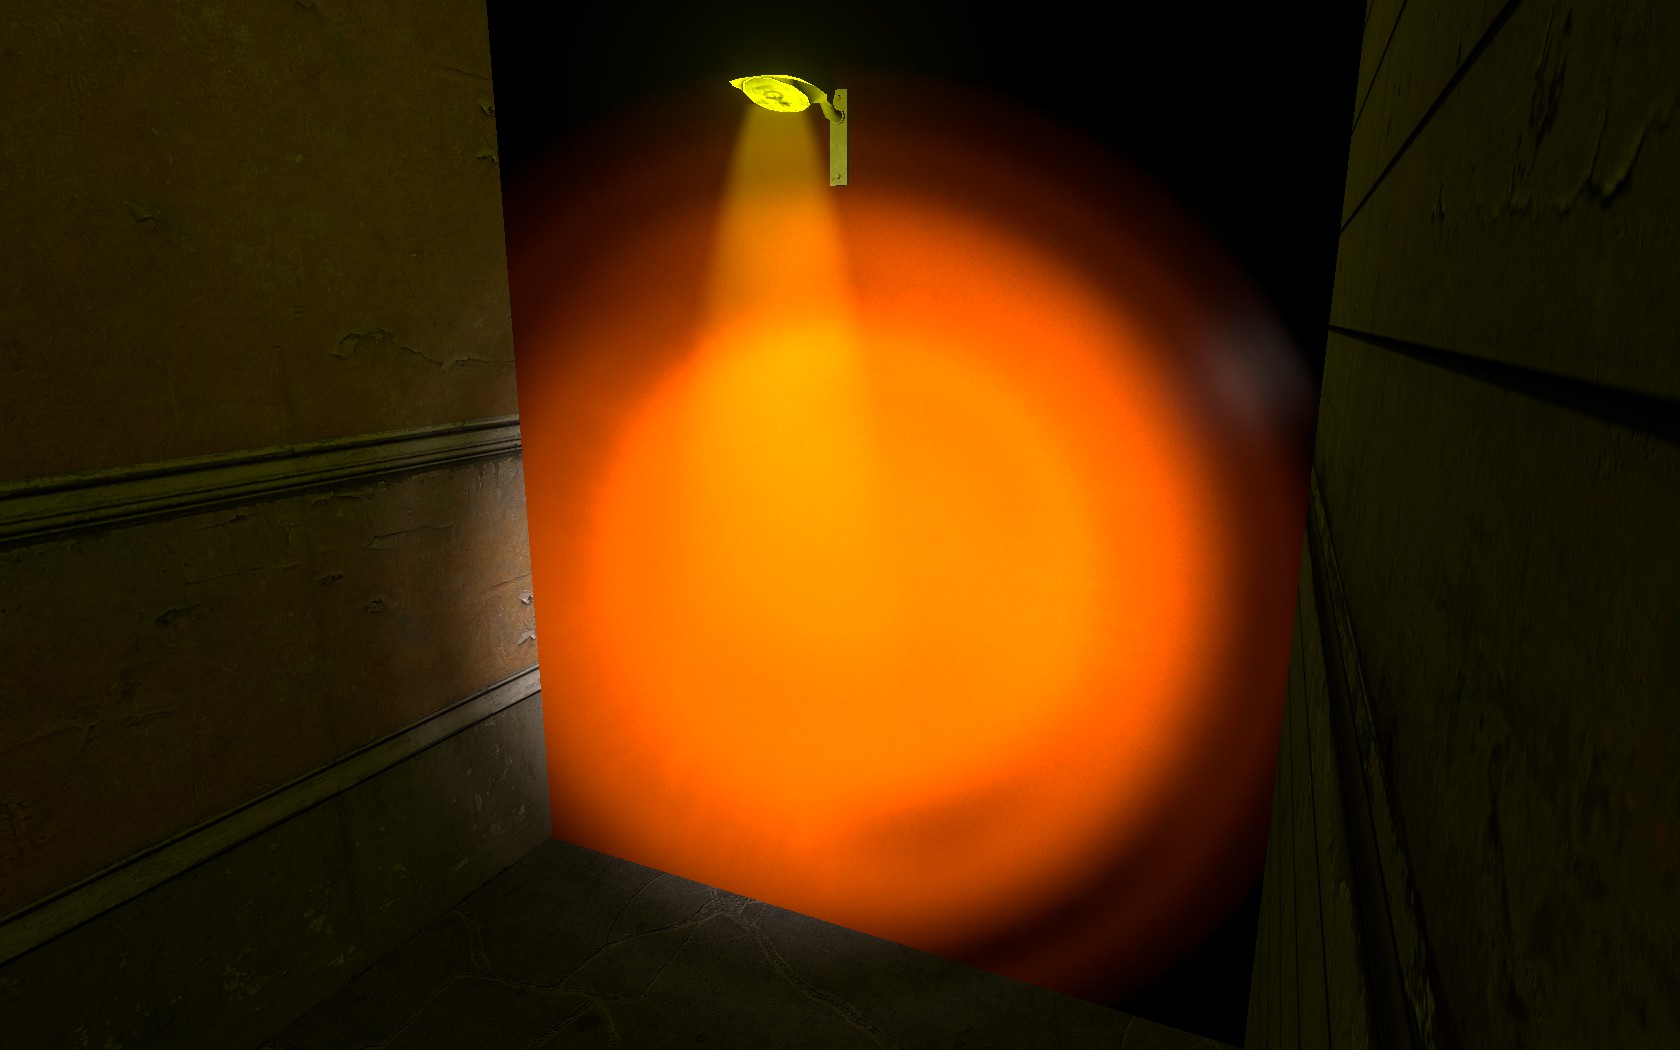
It doesn't await too great, only we're going to practise some things to make information technology look better.
Transparent Textures, Decals
Say I wanted to spray this on a wall.

To start, import the texture into VTFEdit. You'll desire to brand sure your texture has some sort of transpoarency or an blastoff layer.
You lot'll notice this white and greyness checker-lath germination where there isn't anything. This is the part of the texture that'south translucent. Save the file as a .vtf file.
At present we're going to create the .vmt file. Click "Tools" and so click "Create VMT". Check the translucent box and create.
Nosotros'll want to add together a few more than things to get the texture to work as a decal. to do this, nosotros're going to create some actress lines.
"LightmappedGeneric" { "$basetexture" "lol" "$surfacetexture" "physical" "$translucent" 1 "$decal" one "$decalscale" 0.25 }
This is what our .vmt file will wait like. Now that we accept that ready, simply put information technology in your materials folder of your game, and create a map using it. Note that textures with translucency do NOT cake off leaks in your map. This is what my texture looks like in game:

Blend Textures
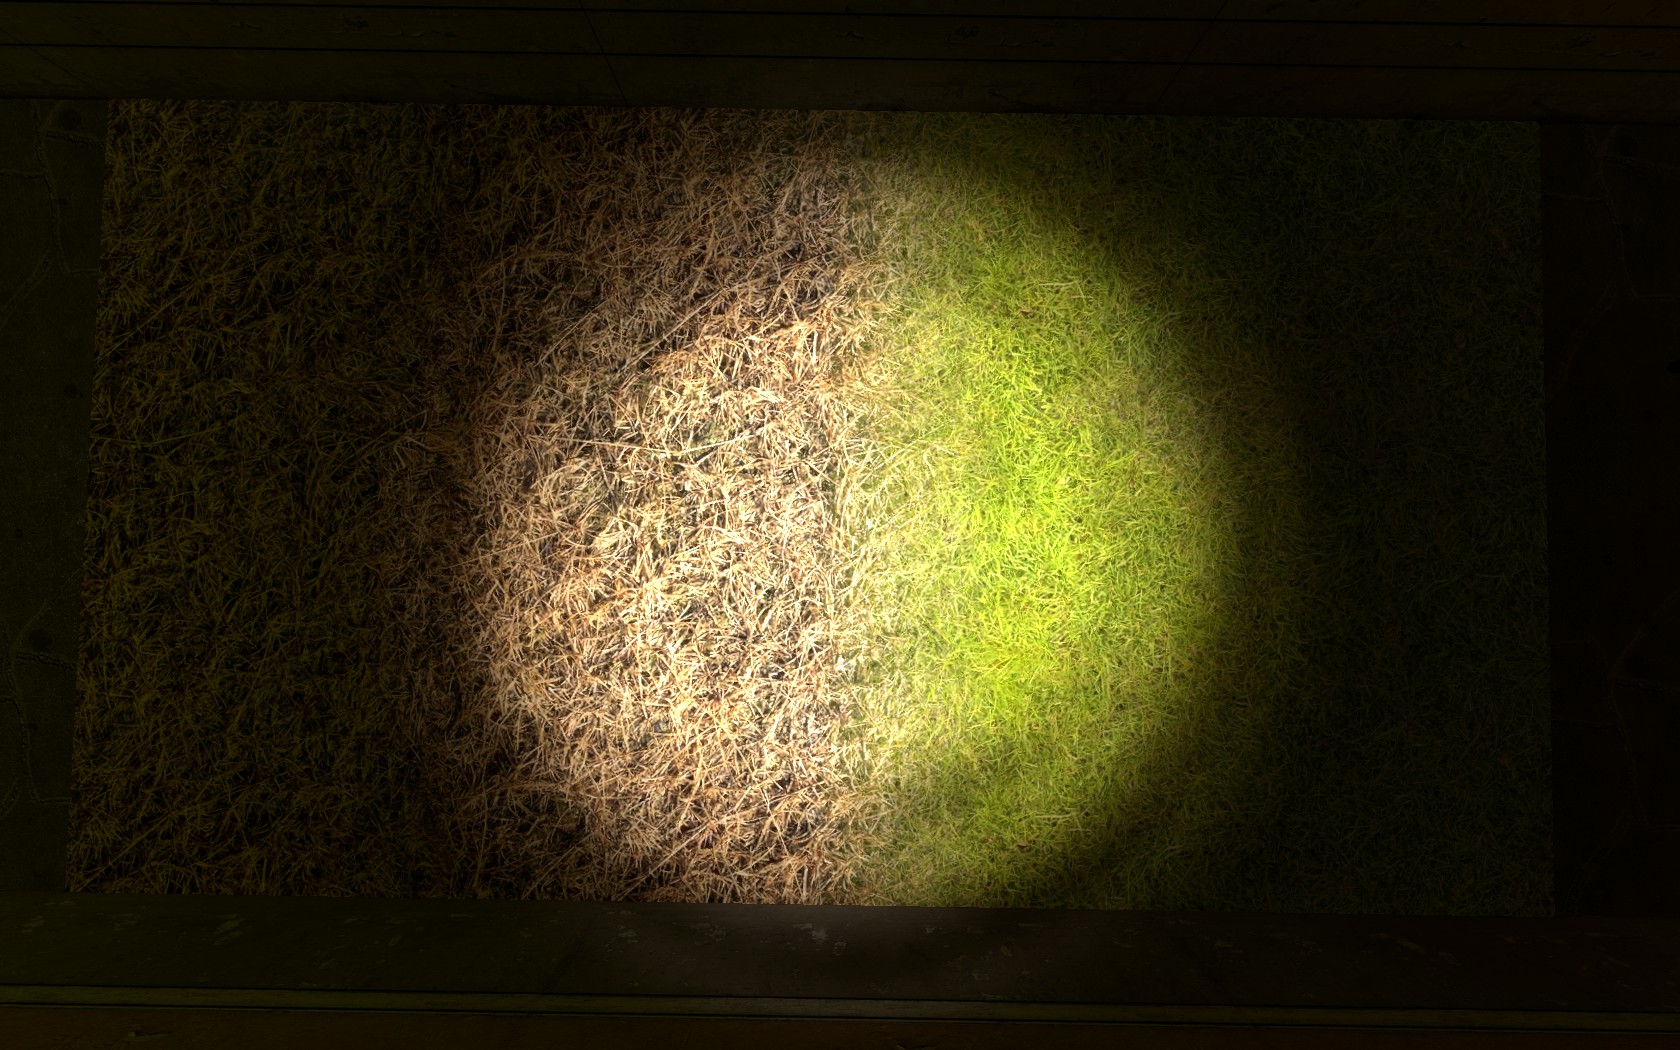
Alloy textures a relatively easy to brand. The offset thing you demand are 2 textures you would like to alloy together. Here, I'grand using a grass texture and a dry grass texture.

To offset, we're going to transform these into .vmf files. So, nosotros're going to create ane single .vmt file which is going to be for our blend texture. What we should add together is something like this:
"WorldVertexTransition" { "$basetexture" "abstract/blendgrass_test" "$basetexture2" "abstract/blenddrygrass_test" "$surfaceprop" "grass" }
Annotation: your texture won't announced to blend when using the Texture Browser.
Y'all can add together unlike surface props using "$surfaceprop2", simply for our case, we don't demand one since both our textures are grass.
Now, to properly use our custom blend texture, nosotros're going to load upward hammer, and use our texture on a deportation. Then, we desire to cull the option "Paint Alpha", and it should blend one of our basetexture textures with the other. Our texture looks like this in game:
Glowing Textures
Lava textures expect better when they glow.

It's actually actually elementary to make a glowing texture. But create the .vmt and .vmf file of your texture, but instead of adding parameters to our .vmt file, we're going to become to the .rad file of our game folder.

Open the file up and you'll see a few lines of code.
lights/fluorescentcool001a 189 231 232 350 lights/fluorescentcool001b 236 255 182 350 lights/fluorescentcool002a 189 231 232 400 . . .
The commencement 3 numbers stand for the RGB (cherry-red, dark-green, blueish) values. The 4th value represents effulgence. So we're going to insert our lava texture along with these other textures. Information technology's the same location as our $basetexture value.
abstract/generic_lava 232 152 2 400
Now, when nosotros load up our game, our lava texture should be glowing.
(Notice how everything around the lava is glowing orangish, nonetheless the lava itself isn't glowing)
Editing HL2 textures
You'll need GIMP for this part of the guide
Say I wanted to edit this dev texture from HL2 to be a different color.
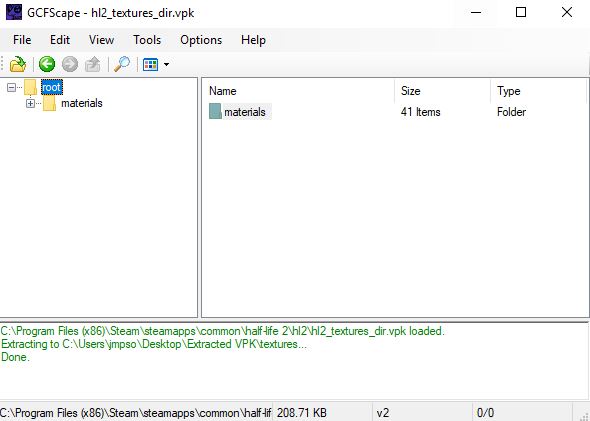
Nosotros're going to exist using GCFScape to extract the texture from a .vpk file in the HL2 folders. We can do this for any source games with .vpk files. To beginning, open up the .exe of GCFScape.
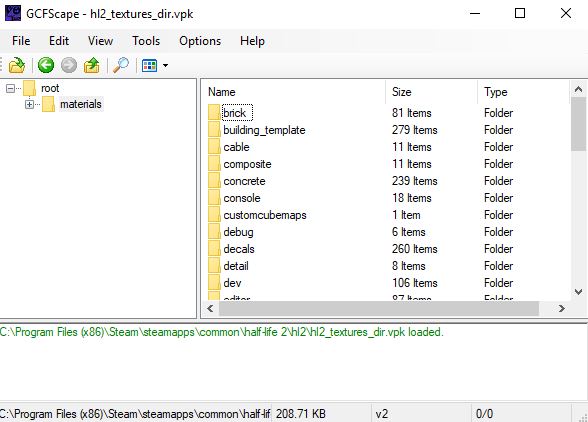
You'll want to search your game files (in this instance, the HL2 files), and discover the .vpk files. The ones you're looking for are the files with "_dir" at the terminate of them. The thing is hl2_textures_dir will requite usa the .vmf files, and the hl2_misc_dir volition give us the .vmt files. W'ere merely going to have to manually extract both of them. Double click the files with _dir at the end.
Now that we have all of the texture files extracted,we're at present going to open the .vtf and open upwards our dev texture nosotros extracted. We're going to click "File" and and so "Export". We're going to export information technology as a.png file. Then we're going to open this file up in GIMP.
We aren't going to do much here. Click "Colors" and then click "Hue Saturation". Hither we can change the color of our .png file easily. Hither, I've changed it to a blue colour. Now we're going to save our new changed texture.
Nosotros're going to go through the aforementioned processof making a texture. This is how our modified texture looks in game:

Creating a Normal Map
A normal map creates the illusion that a texture is 3D but isn't. A comparison of a texture with a normal and i without is massive, peculiarly when viewed with a flashlight or sideways.
Hither's an example for a marble floor I generated with SSbump Generator:

VTFEdit can create normal maps, just they unremarkably don't create the best looking or most realistic normal maps. We're going to be using SSbump Generator [sourceforge.net] for creating our normal maps.
If you're using VTFEdit, read this part of the guide
To starting time, open up up VTFEdit and then import an image. You'll want to save this image equally a .vtf for now, considering you'll need a regular .vtf file and a .vtf file that'south a normal map. It'southward relatively simple to brand a normal map, when you import a file, in that location should exist an pick to "Generate Normal Map". You'll want to bank check "Wrap Normal Map", which means that your normal map tin exist tiled. Once you're happy with your settings, click "OK".
Now you'll want to save your normal map as a .vtf file.
If you're using SSBump generator for this part of the guide, read this part of the guide
To start, open the .exe file in SSBump.

Looking at the top of the program, yous'll want to add an epitome, in this case, the epitome file for our custom texture. You'll want to make sure information technology only generates a normal map in the settings. Next, you lot'll want to build a normal map with it. At the elevation of the screen, there should be a button to generate a normal map. Click that.
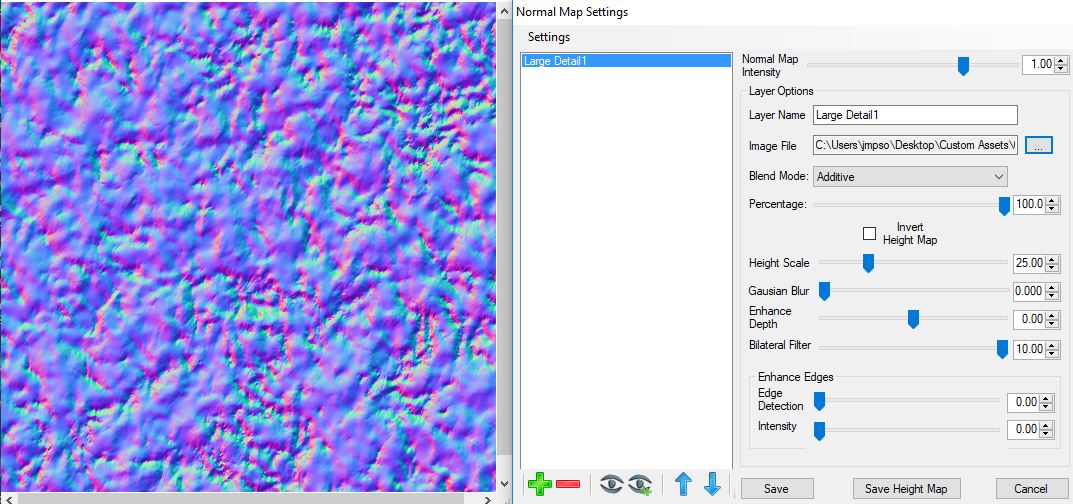
A new set of settings will appear. We'll want to select our image file, and add a layer. A layer can be either Default, Fine Detail, Medium or Large Item. Y'all can have multiple layers. For united states though, we're going to be using Large Detail. Now you'll desire to click "Save Meridian Map". Yous'll need to relieve it as either a .jpeg, a .png or a .tga file (Those are the few compatible imports we tin practice in VTFEDit). And and then y'all want to transform your normal map into a .vtf file.
When you have finished making your normal map, jump to here
Once you accept the .vtf file for your normal map and your base of operations texture, create a .vmt file. We'll be calculation these parameters to our marble floor texture.
"LightmappedGeneric" { "$basetexture" "abstract/marble_floor" "$surfaceprop" "Tile" "$envmap" "env_cubemap" "$bumpmap" "abstruse/marble_floor_normal" }
The "$bumpmap" parameter defines the normal map it'll use on our texture. In game, our marble floor looks like this:

(Notice how the reflections on the texture are handled)
Detail Textures
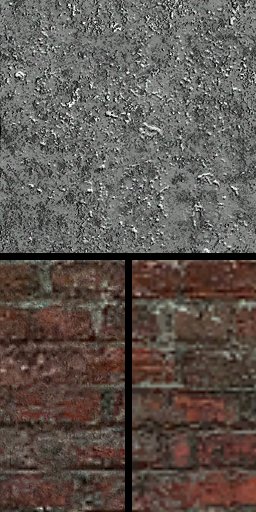
Particular textures are used when a player views your texture up close, and the texture seamlessly gets a higher resolution. A good explanation of what it does can be found hither. Usually, information technology's a grayscale image that doesn't really tile. Here's an example of the noise_detail_01 texture from the VDC:
The left texture uses a blend texture, the correct texture doesn't.
And to brand it useable with a texture, you'll demand to add the "$detail" parameters to your texture. A vmt with a working detail texture looks like this:
"LightmappedGeneric" { $basetexture "abstract/generic_lava" $detail detail/noise_detail_01 $detailscale 7 $detailblendfactor .8 $detailblendmode 0 }
The $detail parameter says what detail texture should be used.
The $detailscale scales the detail texture to a sure size before information technology gets tiled once again.
The $detailblendfactor specifies the alpha value of you detail texture. usually, 0.8 is a skillful starting value.
And the $detailblendmode species the way your detail texture should be used with your $basetexture. In this instance, 0 is just the normal style of using a detail texture.
Creating a detail texture is very piece of cake. You simply make a grayscale image of something, so use that texture in your .vmt parameters.
Creating a scrolling texture
I have a dainty Lava texture that we made glowing, but I want it to exist scrolling.
To start, we're going to become in the .vmt file and modify it. We're going to be adding a "Proxies" tab. There a literal metric ton of Proxies nosotros could add, but we're just going to exist adding "TextureScroll" to the Proxies listing. Our .vmt file should look like this:
"Lightmappedgeneric" { "$basetexture" "abstract/generic_lava" "$bumpmap" "abstruse/generic_lava_normal" "Proxies" { "TextureScroll" { "Texturescrollvar" "$Basetexturetransform" "Texturescrollrate" 0.5 "texturescrollangle" xc } } }
TextureScroll has two different things nosotros can change. The texture scroll rate, and the texture scroll angle. The texture scroll rate means how fast our texture scrolls, so the smaller the number, the slower the scroll (values in a higher place 2 are still quite fast, and then try to stick to 1 or a lower, decimal value). Texture ringlet angle means the angle it scrolls at. xc degrees is sideways.
Rotating Textures
Sometimes you just demand a footling rotation. Hither'southward an example of a texture that rotates:
"LightmappedGeneric" { "$basetexture" "models/props_c17/bladeblur" "$angle" 0.0 "$translate" "[0.0 0.0]" "$center" "[-0.v -0.five]" "Proxies" { "LinearRamp" { "rate" 45 "initialValue" 0.0 "resultVar" "$bending" } "TextureTransform" { "translateVar" "$translate" "rotateVar" "$angle" "centerVar" "$center" "resultVar" "$basetexturetransform" } } }
That texture is the helicopter bract on the Hunter Chopper NPC. You lot might notice nosotros're using texture variables, more on that later.
The LinearRamp proxy makes the value that constantly increases.
And since there is no proxy for defining rotation, like we had with TextureScroll and AnimatedTexture, we're forced to employ the "TextureTransform" proxy.
Creating an animated texture
Here's a rainbow texture I want to be animated in game:

Make sure you lot have all the frames of your animated texture
To outset, you'll desire to open up VTFEdit. We're going to be importing multiple images at once. To import multiple images, click the "Import" push, then click all the frames (in social club from first to terminal) holding CTRL on your keyboard. Once you have all your frames selected, you tin import them into VTFEdit.
Now save the file as a .vtf file, so create a .vmt file. Nosotros'll be calculation these lines of code to the file:
"LightmappedGeneric" { "$basetexture" "rainbow" "$selfillum" 1 "$selfillummask" "rainbow" "Proxies" { "AnimatedTexture" { "animatedTextureVar" "$basetexture" "animatedTextureFrameNumVar" "$frame" "animatedTextureFrameRate" "3" } } }
Nosotros're using the "$selfillum" parameter because if our rainbow texture nosotros're to be affected by light, it would look pretty ugly. Animated texture frame rate ways how fast our textures cycles between frames. 2 is a good starting value. College values cycle through frames faster. For example, a value of x will mean that the texture cycles to the next frame every ten frames per second.
Skybox Textures
Skyboxes are simply the sky that surrounds your level.

Skybox textures consist of 6 different textures, the BK (back), the DN (down), the FT (front), the LF (left), the RT (right) and the Upwardly (acme). We just add together those two messages at the cease of our texture.
"UnlitGeneric" { "$basetexture" "skybox/starfieldBK" "$hdrcompressedtexture" "skybox/starfieldBK" "$nofog" i "$ignorez" ane }
Annotation: that your texture must be in a binder called "skybox".
Note: you lot'll demand to add all the directions beyond six .vmt files to brand the skybox piece of work.
The parameter $ignorez means that your texture will always be in front end of annihilation 3D and behind annihilation that'southward part of the skybox. A brusk explanation tin can be found hither.
The parameter $nofog just means our texture doesn't get affected past whatever fog in our map, which is pretty of import, believe it or non for making sure your skybox is rendered without fog roofing information technology.
The parameter $hdrcompressedtexture is explained here. In short, it means the
skybox is brighter and has a higher high dynamic range.
And since skyboxes don't have lite rendered on summit of them, they use the "UnlitGeneric" shader parameter.
Texture Variables
Textures tin accept variables. You simply define something that doesn't do anything by default, for example:
"LightmappedGeneric" { "$ten" x }
What did we practise at that place? We essentially told source that our texture has something called "$ten" and that has a value of 10. Merely the thing is, $10 isn't a normal parameter, so information technology's essentially a variable now.
Now, you lot might ask: "Why are these even useful?" Here's an instance:
"LightmappedGeneric" { "$basetexture" "jmp/neon/transparent_break" "$alpha" 0.75 "$translucent" 1 "$envmap" "env_cubemap" "$surfaceprop" "computer" "$nocull" 1 "$starting time" "0" // The texture variable gets defined every bit 0 "Proxies" { "EntityRandom" { "calibration" "12" "resultVar" "$offset" } "AnimatedTexture" { "animatedTextureVar" "$basetexture" "animatedTextureFrameNumVar" "$frame" "animatedTextureFrameRate" "$offset" } } }
What all of this stuff does is that it creates a random number with a scale of 12 to be the frame rate of the texture. The "EntityRandom" proxy generates a random number, and then information technology'southward useful for creating random things for your texture.
There are many other proxies that can be used for number generation also.
Custom Sprites
Custom sprites are similar regular textures, except they're used with the env_sprite entity and the env_sprite_oriented entity in hammer. Here's an example of a sprite texture I institute with some modifications using GIMP.

Hither's what the .vmt file would wait like.
"Sprite" { "$basetexture" "jmp/neon/sprite_example" "$spriteorientation" "vp_parallel" "$spriteorigin" "[]" "$translucent" 1 "$nocull" 1 "$vertexcolor" 1 "$vertexalpha" ane }
What happens in this .vmt file is that we're creating a very flat, inexpenisve 2d texture. You lot should be able to add or tweak any parameters to your needs. I couldn't effigy out what the $spriteorigin parameter does, and so you should just get out it to what I fabricated it be.
Note: the paramaters $vertexcolor and $vertexalpha practice not piece of work in CS:Become.
Hither's a tabular array with all the possible $spriteorientation parameters with descriptions on what they do.
facing_upright
Doesn't do anything? All I could observe almost this is that it'southward unused and probably non functional.
vp_parallel
Brand the sprite e'er face the player. Usuaully you would use this.
vp_parallel_oriented
If the sprite is orientated, the sprite volition match the orientation given.
oriented
The sprite is orinted to the globe, and does not constantly face the player.
Compile Parameters
Compile parameters are substantially parameters that start with a % instead of a $. According to the VDC, compile parameters change the vbsp compile behavior of materials. I've created a full table to all or virtually of the compile paramters and what they do. If the exclusive flag is yes, then it ways that only one of the flags can be prepare on any fabric. Most of these compile parameters are booleans, which means they can only accept a 0 or a i equally a given parameter.
Compile Parameter
Part
Sectional Flag?
%compileclip
Makes your material have the same properties every bit the Clip cloth.
Yes
%compilenochop
Prevents 'subdiving patches' on the surface. According to the VDC, it presumably affects how the face is converted to triangles.
Yep
%compilenpcclip
Makes your material have the same properties as the NPC clip cloth.
Aye
%compileorigin
Makes your material take the same properties as the origin fabric, which sets the origin of a brush entity. Does not work in source.
Aye
%compiletrigger
Makes your material have the same backdrop as the trigger material.
Aye
%compileskip
Makes your fabric accept the aforementioned properties as the skip material.
Yes
%compilesky
Makes your cloth show the 3D skybox, as well equally emitting light_environment lights. Has the same properties as the heaven material
Yes
%compile2dsky
Makes your cloth show only the 2D skybox, equally well every bit emitting light_environment lite. Has tge same properties as the sky2d cloth
Yeah
%playerclip
Makes your material accept the same properties as the player clip material.
Yes
%compileblocklos
Makes the brush block the line of sight of NPCs.
No
%compiledetail
Forces the brush to not cut visleafs, similarly to func_detail.
No
%compilehint
Makes the face cutting visleafs in the way the hint material does.
No
%compileinvisible
Makes a surface invisible like nodraw, but allows bullets to laissez passer through. Makes it similar to the invisible material.
No
%compileladder
Makes the brush usable with the func_ladder entity. Likewise similar to the ladder material.
No
%compilenodraw
Makes a brush comport exactly like the nodraw material.
No
%compilenonsolid
Makes the castor not solid to annihilation.
No
%compilenoshadows
Prevents shadows from being cast onto the texture.
No
%compilepassbullets
Allows bullets to laissez passer through a brush. Good for any materials with large holes in information technology.
No
%compilewater
Makes the brush take the properties of h2o.
No
%compileslime
A varient of the %compilewater parameter, makes the brush behave exactly like h2o except has green splashes.
No
%compilekeeplight
Used with %compilewater and %compileslime, allows the material to keep lighting information.
No
%detailtype
Allows details (like grass) to exist used on the texture. This parameter is not a boolean!
No
Creating a water texture
This is probably i of the most painful things I take ever created. For the sake of preserving my sanity, we're going to use our custom lava texture again.
Water is seperated into 2 catagories, expensive and inexpensive. Expensive h2o has real time reflectures, but is very plush to run. Inexpensive h2o, uses cheaper reflection (env_cubemaps), which are pretty ugly on water, but require a lot less to run.
The affair is, we're going to need a beneath texture for our h2o. Commonly, it'south very similar to the regular texture. It can exist an entirely seperate texture to the water itself, and have it's own .vmt file (unlike normal maps). For the sake of time and again, preserving my sanity, we're just going to use the same surface texture.
In that location's going to be a nightmare of editing the .vmt file.
I'll do my best to explain what each does.
"LightmappedGeneric" { "$basetexture" "abstract/generic_lava" "$translucent" 1 "$forceexpensive" 1 // This volition force the water to utilize the expensive texture, no thing what "$forcecheap" ane // This will strength the h2o to utilise the cheap texture, no thing what "$reflectentities" one // This will make the water reflect entities "%tooltexture" "dev/water_normal" // Changes the icon of the water in hammer. Useful for weird .vtf files "$refracttexture" "_rt_WaterRefraction" // This will enable real time reflections. You lot MUST use this verbal refract texture "$refractamount" three.0 // This is how much the refractions volition be warped "$refracttint" "%compilewater" 1 // This will tell source that your texture is water "$surfaceprop" "water" // You lot NEED this for your water texture. Source will freak out if you don't "$bottommaterial" "abstract/generic_lava" // This is our normal map that will be used for the h2o "$bumpframe" 1 // "$fogenable" one // This enables the fog when yous're within the water "$fogcolor" "{232 152 2}" // This is the colour of the water underwater. In this case, we're using the glow texture of our lava "$fogstart" 0 // The distance, in inches, where the fog starts. 1 inch = 0.75 hammer units "$fogend" 100 // The altitude, in inches, to where the fog ends "$abovewater" 1 // Just something y'all need for the texture to piece of work "$texoffset" "[0 0]" // Water can await ameliorate if yous offset and calibration it down a petty, although this is entirely optional "$texscale" one "Proxies" { "AnimatedTexture" { "animatedTextureVar" "$basetexture" "animatedTextureFrameNumVar" "$frame" "animatedTextureFrameRate" "ii" } // If your texture is animated, it'll need this to piece of work "TextureScroll" { "Texturescrollvar" "$basetexturetransform" "Texturescrollrate" 1 "texturescrollangle" 90 } // Pretty much all water textures will apply this, the texture volition simply scroll "WaterLod" { } // I have basically no thought to what this does, merely it'due south needed for your water texture to work with the water_lod entity in hammer (which determines when your water uses the cheap texture or the more expensive texture).
That's a lot of info to take in. We're going to adapt this to our lava texture we fabricated earlier. Nosotros won't be needing the refracting parts of the texture, and merely need water physics and h2o fog.
It'll expect something similar this:
"Lightmappedgeneric" { "$basetexture" "abstract/generic_lava" "%compilewater" 1 "$surfaceprop" "h2o" "$bottommaterial" "abstract/generic_lava" "$bumpframe" 0 "$fogenable" 1 "$fogcolor" "{232 152 2}" "$fogstart" 0.00 "$fogend" 100.00 "$abovewater" 1 "Proxies" { "TextureScroll" { "Texturescrollvar" "$Basetexturetransform" "Texturescrollrate" 0.five "texturescrollangle" 90 } "AnimatedTexture" { "animatedTextureVar" "$basetexture" "animatedTextureFrameNumVar" "$frame" "animatedTextureFrameRate" "2" } } }
At present that that'due south complete, nosotros're going to re-create and paste this into our .vmt file and boot information technology up in game. The underwater function of our lava texture looks like this:

The thing is, this isn't really a water texture. Yes, source does consider it water, but it only uses the water properties. To arrive truly h2o, nosotros would have to utilise the "Water" shader parameter. This will change the upshot to something way more realistic. Textures using the "H2o" shader don't need a $basetexture if information technology'southward an orange box game or older. We're simply going to change our "LightmappedGeneric" to "Water" to change how it looks in game. This will add the realistic wave upshot.
Mirrors
A mirror is essentially a super-reflective texture. They are put on func_reflective_glass entities in hammer.
Here is what our .vmt parameters would await like:
"lightmappedreflective" { "$basetexture" "abstract/mirror_test" "$refracttexture" "_rt_WaterRefraction" "$refractamount" "0" "$refracttint" "[.5 .v .6]" "$reflecttexture" "_rt_WaterReflection" "$reflectamount" "0" "$reflecttint" "[1 1 1]" "$fresnelpower" "0" "$minreflectivity" "0.8" "$maxreflectivity" "i.0" "$normalmap" "dev/flat_normal" "$surfaceprop" "glass" "$bumpframe" "0" }
What we're substantially doing here is making our regular texture use the refract and reflect water parameters. This creates the mirror result nosotros want. We could also change the tint parameters to change the colors reflected if we really wanted to. Our texture in game looks like this:
Note: the texture will appear as a missing texture in the level editor in hammer. The texture will properly load ingame.
Note: don't stack 2 mirrors where they come across each other. You'll be unable to compile your map.
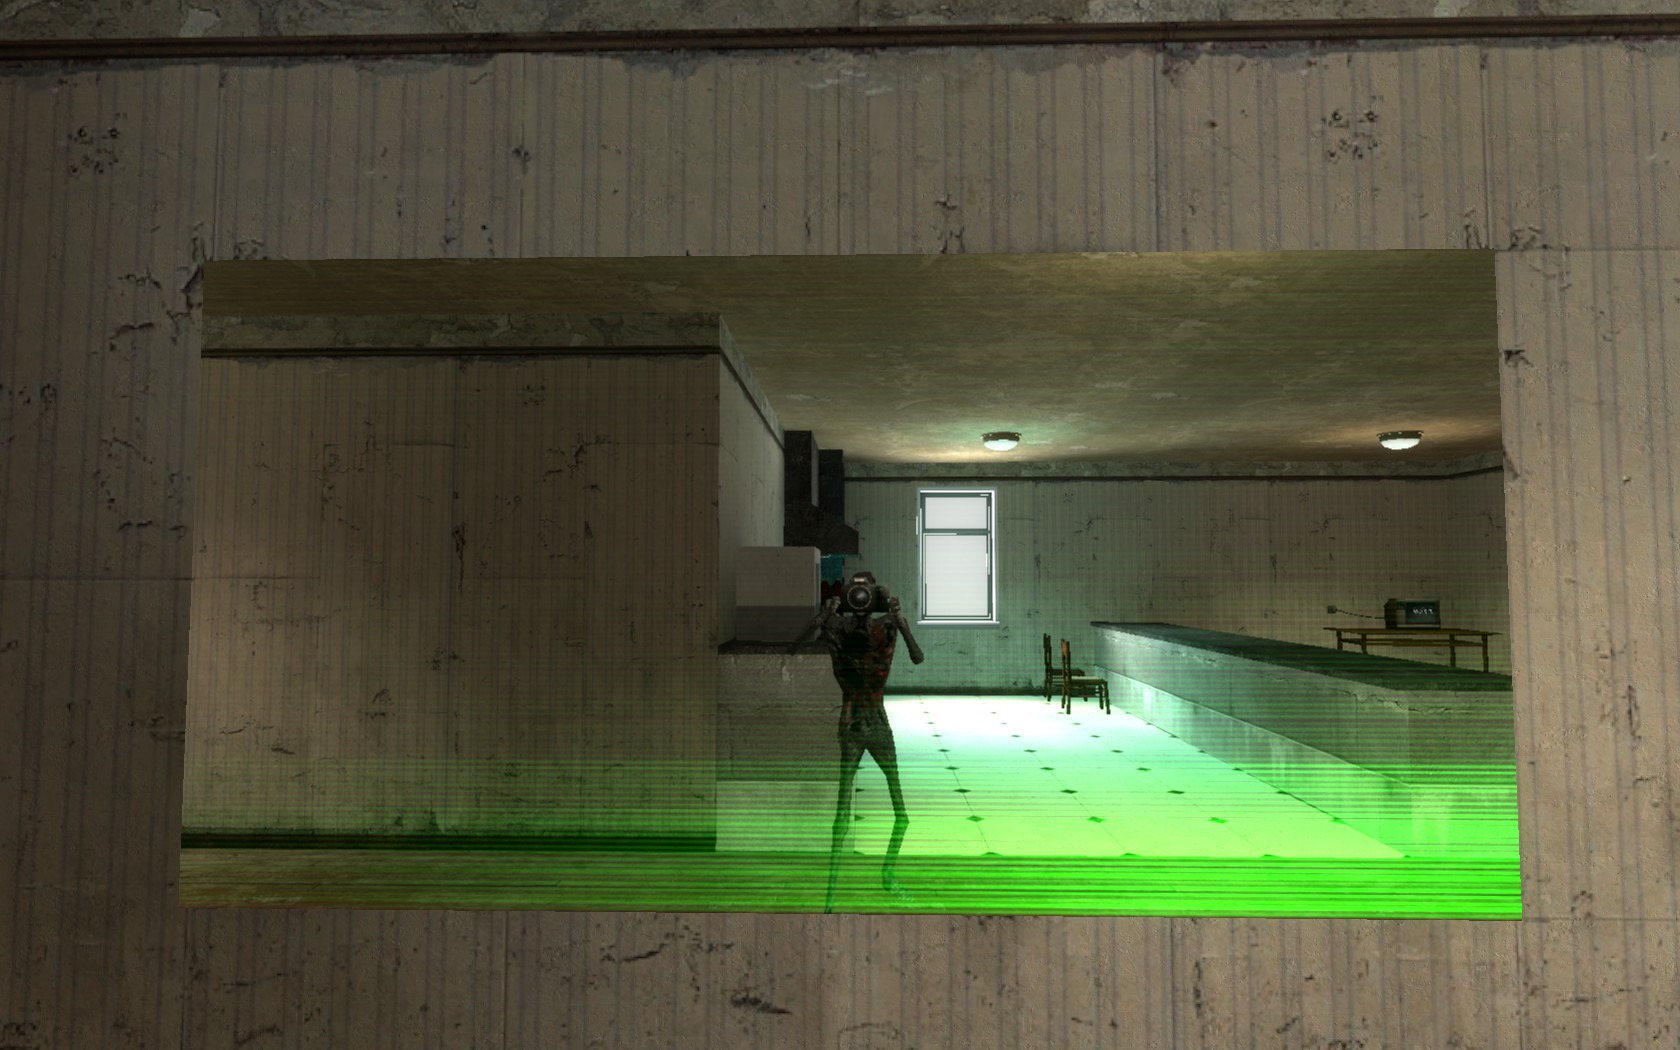
Creating a monitor texture
Since no one has ever made any remarks about custom monitor textures, I'll have the step forward and figure it out. Hither's a scan line image I'll be using for this:

To kickoff, we're going to brand this a .vtf file. Then we're going to brand one hell of a .vmt file. The outset thing we MUST add to our texture is:
"Unlittwotexture" { "$basetexture" "_rt_Camera" "$translucent" i "$surfaceprop" "glass" "$additive" 1 "$texture2" "abstruse/scan_lines" }
This tells source that our texture is uniform with the func_monitor entity (meaning that it doesn't produce a missing texture when used). We too don't demand to the "$texture2" parameter, if we just wanted our photographic camera without whatever sort of overlay. Aforementioned goes for "%tooltexture", but that's just to help us know if information technology's a monitor texture in hammer.
Our full texture should look something similar this:
"UnlitTwoTexture" { "$basetexture" "_rt_Camera" "%tooltexture" "dev/dev_monitor" "$surfaceprop" "glass" "$condiment" "1" "$texture2" "PerfTest/scan_lines" "Proxies" { "Sine" { "resultVar" "$colour[0]" "sineperiod" 1 "sinemin" .1 "sinemax" 0 } "Sine" { "resultVar" "$color[two]" "sineperiod" .01 "sinemin" .ane "sinemax" 0 } "TextureScroll" { "texturescrollvar" "$texture2transform" "texturescrollrate" .06 "texturescrollangle" -90 } } }
This is but some parameters pasted over from other monitor textures in source. The "Sine" proxy adds the moving ridge effect you sometimes see on monitors. Well-nigh monitor textures in source use the same texture, but have variations due to the .vmt parameters. Our monitor texture in game looks similar this:
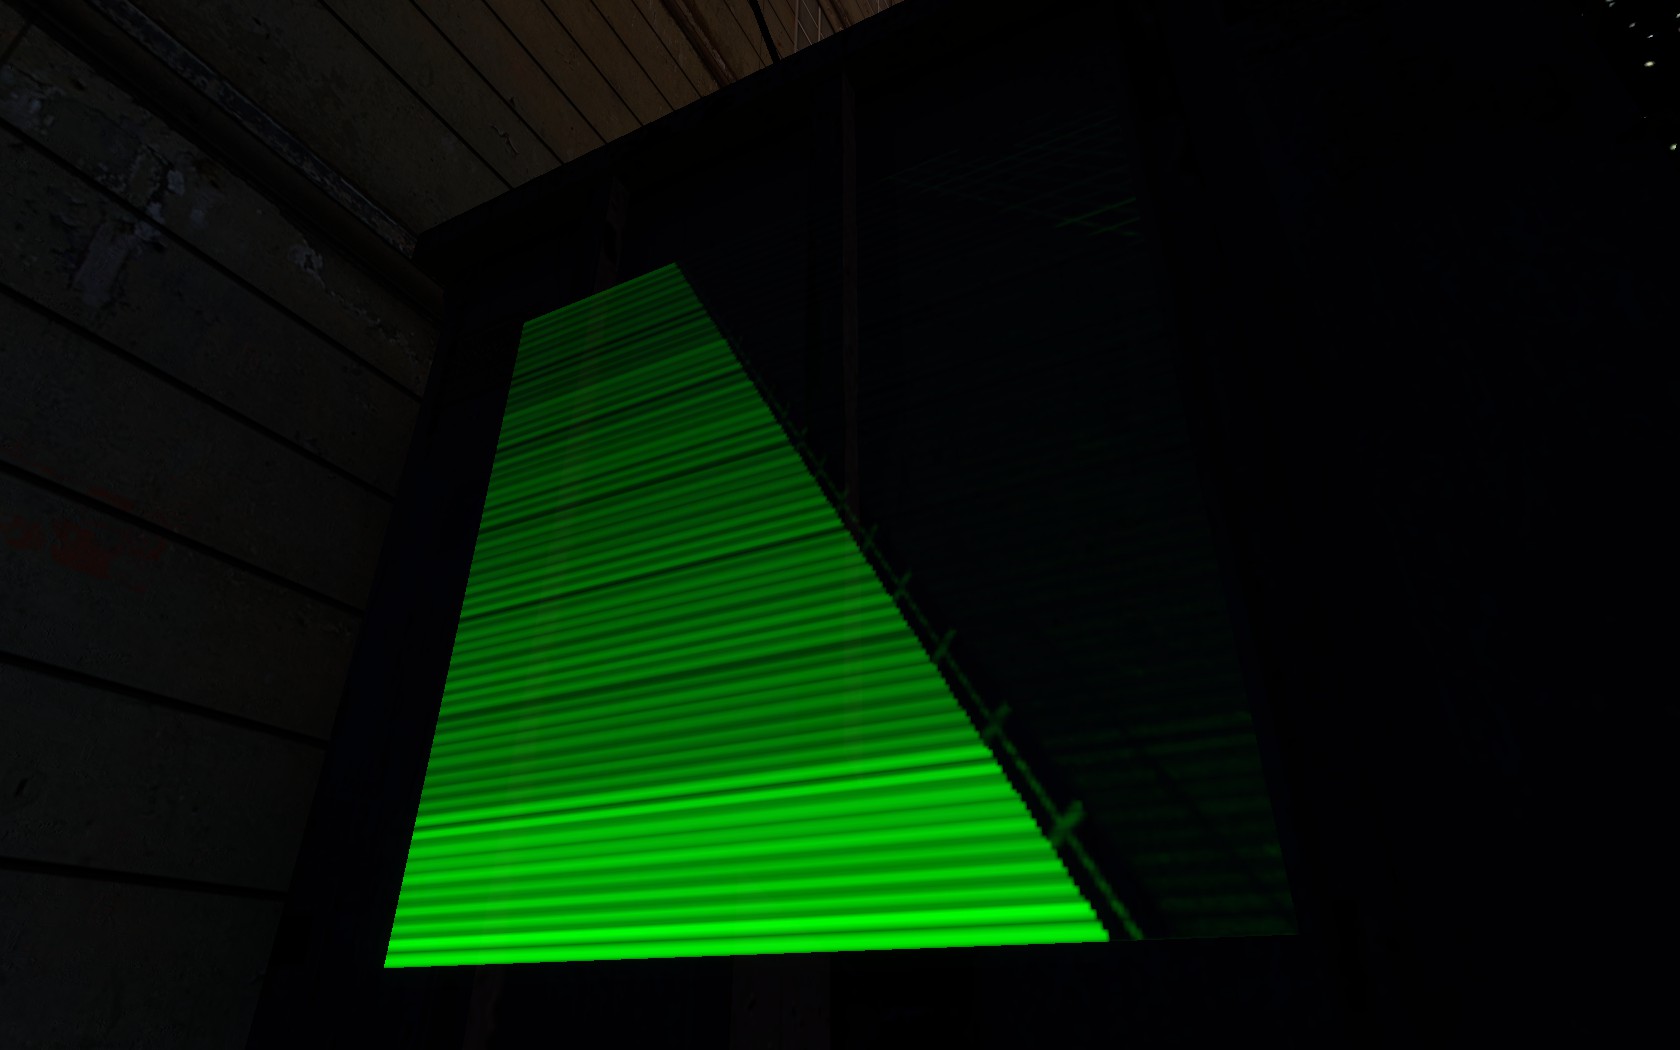
(Notice how Gmod makes a mess out of the photographic camera angles, but the texture does work.)
A list of some texture parameters
A list of some parameters yous can put in a .vmt file. A total list an be constitute Hither.
"LightmappedGeneric"
"$basetexture" "TEXTURE_NAME"
// This is the name of your texture
"$surfacetexture" "Watermelon"
// This is the surface texture, which defines stuff every bit what bullet decals look like and surface properties
"$translucent" 1
// This means it will use the blastoff aqueduct (transparency) of the texture
"$basetexture2" "TEXTURE_NAME2"
"$surfacetexture2" "Concrete"
// These are used with blend textures to define the other cloth's parameters
"$decal" 1
"$decalscale" 0.25
// This means that the texture is a decal, decal scale is the scale of the texture
"$nodecal" 1
// This makes your texture not prove bullet decals when shot
"$alpha" 0.5
// Makes your texture have a defined alpha (transparency), which is useful for glass textures. Tin can only exist a value between 0 and 1
"$envmap" "env_cubemap"
// This ways that the texture volition utilize reflections created by cubemaps
"$bumpmap" "TEXTURE_NAME_normal"
// This means it will use the normal map of a texture. The name of the normal tin be annihilation, merely is unremarkably the proper noun of the texture follow by _normal
"%compilepassbullets" 1
// This will make it then bullets get through the texture
"%notooltexture" one
// This will make your texture not able to be found in the hammer texture browser
"%keywords" "KEYWORD"
// This will use the keyword function in the hammer texture browser
"Proxies"
// This volition enable Proxies to exist used on the texture (stuff like animated textures)
"TextureScroll"
{
"Texturescrollvar" "$Basetexturetransform"
"Texturescrollrate" 2
"texturescrollangle" 90
}
// This will make your texture scrolling, texturescrollrate changes how fast the texture scrolls, texturescrollangle changes the management it scrolls (xc is sideways)
"AnimatedTexture"
{
"animatedTextureVar" "$basetexture"
"animatedTextureFrameNumVar" "$frame"
"animatedTextureFrameRate" ii
}
// This volition brand your texture animated, animatedTextureFrameRate changes how fast it changes between frames (2 is default)
Shaders and Proxies
Shader types are substantially the get-go line in your .vmt file.
"LightmappedGeneric"
That was an example of a shader yous can use for your textures. There are many different types of shaders, all of which tin be found here if yous're really curious.
I've created a table of most shader parameters you'll use and what they do. This too covers some more abstract texture shaders.
LightmappedGeneric
The base texture shader. Used on about regular textures.
VertexlitGeneric
Used equally the default shader for models.
WorldVertexTransition
Used with blend textures. Should E'er be used, since without information technology, blend textures can create weird lighting issues.
UnlitGeneric
But doesn't render light on your textures. Non used with models.
LightmappedReflective
Used by mirrors to make textures cogitating.
Refract
Distorts objects behind the texture. More than info here.
DecalModulate
Allows decals to be able to spawn on both models and textures.
Patch
It'southward a piffling difficult to explain, more info here.
SpriteCard
Used with particles. More info hither.
ShatteredGlass
Used on textures that can be used with the func_breakable_surf. (The proper glas breaking texture)
Water
Is used with h2o textures. Information technology creates the wave effects and such. You can create water without the need of having the "Water" shader parameter. More info here.
UnlitTwoTexture
Simple allows ii textures to be used in 1 .vmt file, and can be transformed independantly. Not to be confused with WorldVertexTransition.
LightmappedTwotTexture
Simply a lit version of the TwoTexture.
Sprite
Used with sprite materials.
Cable
Used for textures that uses the rope entities in hammer.
Essentially, DX values are used on PCs with lower specs, to meliorate performance. Information technology'll only be activated when
Since there are actually a metric ton of proxies that be (excpet most of them are just used for very specific circumstances), I'm only going to leave a link here, so you can explore on your own fourth dimension.
A list of all sources and useful websites
Thank you for reading!
If you lot enjoyed the guide and want to support me, you can positively charge per unit this guide.
If you have whatsoever suggestions / questions, y'all can post them in the annotate section. I'll try to read them or answer them as fast as I tin.


How To Make Background Map Hammer,
Source: https://steamcommunity.com/sharedfiles/filedetails/?id=1372652108
Posted by: bowyerhunhis.blogspot.com
0 Response to "How To Make Background Map Hammer"
Post a Comment